Contrary to what you might believe, it’s not as challenging to get studio-quality sound in a home studio. Even if you’ve not spent a small fortune on equipment, generators, and microphones, there’s plenty you can do to achieve that perfect tune. How can you get studio-quality sound at home?
To get studio-quality sound at home, you need recording equipment, a sound-proof environment, premium audio editing software, and correct recording techniques for recording the best sound without an expensive studio. If your home doesn’t allow for this, you might want to look at other options.
But is that all? This article will go into detail on all the essentials you need to get studio-quality sound at home. Let’s get started!
Why Buying Simple and Inexpensive Is the Best Option
You might be tempted to invest in the most expensive equipment and software money can buy because you saw an ad online or in someone’s Instagram post.
You want to create music at home that’s of premium quality, but by attempting too much too fast and going in head-on, you will be overwhelmed, not to mention over-budget, which will end in disaster.
Whether this is a hobby or a business venture, you want to keep things simple and inexpensive, at least at first. Once you’re used to the system, only then should you take the next step and bring in more advanced equipment.
Otherwise, you’ll become demotivated, and you’ll quit.
How Cheap Should You Go When Buying Recording Equipment?
Home recording is expensive, which is why people either search for the most affordable things they can find or the most expensive to fill up their studio.
We already know expensive isn’t the way to go. But if you buy something cheap, you have to wonder, how cheap is too cheap?
You want to create studio-quality sound at home, and for that, you’ll need to pay more than $1000.
You’ll read on plenty of blogs that you can easily set up a working studio for only $400 – $500, but that’s a very low limit if you want to create good-quality sound at home.
What You Need To Create Studio Quality Sound at Home
Here is a list of home recording essentials that may seem basic, but you’ll find out later how valuable these pieces of equipment can be:
A Decent Computer

We mention the need for a computer first because this requires a lengthy discussion.
Many options come to mind when deciding on a computer, including either a laptop or a desktop. Depending on your needs, your desktop or laptop may be different than what someone else requires.
For either option, the three factors you must determine:
- Portability
- Processing speed
- Budget
You will also need to decide whether you want a PC or a Mac. We won’t go into the PC vs. Mac debate because everyone has their own opinion. But if a Mac suits your skills better, and you like the OS, get a Mac. If not, and you like a Windows computer more, get a Windows computer.
As for deciding between a desktop or a laptop, if you plan to play your music or audio elsewhere and portability is your primary factor, buy a laptop with minimal mechanical noise, backlit keys, a greater screen size, and multiple ports.
But if you need a computer primarily for your home studio, a desktop is your best bet, as they are faster, have more ports, offer better customization options, and don’t produce as much noise.
Various laptops and desktops offer ultra-fast processing speed, but deciding on the right one depends on your budget.
You won’t get a good computer within $500, but you don’t need to spend a fortune either. Here is the low-down on some of the best computers you can buy for music production, which should help you make the right choice.
DAW (Digital Audio Workstation)

When buying a computer, make sure yours supports DAW software.
DAW, or digital audio workstation, is software that is used when recording, mixing, and editing the sound you make. You’ll find plenty of great options when searching for daws, like the Avid Pro Tools or Logic Pro, for example.
However, a professional tool like Avid Pro Tools might not be the best choice for a beginner as it can have quite a steep learning curve. Also, it’s defiantly not cheap.
A better option for beginners is the PreSonus Studio One 5, a DAW software that is more intuitive, with easy drag-and-drop functionality, and won’t break the bank.
PreSonus actually offer their Studio One software for free if you buy one of their audio interfaces.
Companies such as Focusrite, Steinberg and Avid also offer tools and copies of their DAW software with their interfaces.
If you own or plan to buy a Mac there is actually a really good free option you could start with. It’s a smaller version of Logic Pro, the famous GarageBand.
If you start using GarageBand and later on find out that you want to upgrade to Logic Pro, it’s no problem.
Most DAWs allow you to choose from a set of templates, which prompts you to include tracks for several different kinds of instruments. You can also make your own templates to reuse in the development of your own style.
Also Read: Audacity vs. GarageBand: Which Is Right for Me?
An Audio Interface

An audio interface is a piece of hardware that connects your gear to your computer.
It translates the sounds from your microphone or instrument into a digital format that your computer can understand. It can also translate the digital format back into the sounds you hear when monitoring the audio.
Read more about audio interfaces in our in-depth guide ‘What Is an Audio Interface? Everything You Need To Know‘.
Beginners will often choose the extremely popular Focusrite Scarlett 2i2 which is a highly regarded USB audio interface with superb quality.
Even though popular among beginners, this audio interface is also often used in many professional situations.
There are more versions of the Scarlett from Focusrite. The main difference is the number of inputs it can handle. Scarlett 4i4, which is the next step up in size, is perfect if you need to record more channels simultaneously, which is essential when recording a podcast for example. All Scarlett audio interfaces include a DAW so you can start recording right away.
Some first time buyers will also be looking at anything by Presonus. Something like the Presonus AudioBox iOne, Presonus AudioBox iTwo, and Presonus AudioBox USB should suit your needs, as they are reasonably priced and offer a premium experience.
A Preamp

Your interface should do the job well of bringing the sound to your recording device.
However, if you want to improve your recording sessions’ overall experience, a preamp will be the best piece of equipment to boost the signal well without increasing the noise floor.
Preamps don’t cost a large fortune, so it shouldn’t be too difficult to find one within your budget. The ART TubeMPSTV3 is good enough to last you a long time.
Remember that if you don’t have the budget for a preamp at present, there’s no reason you should get it.
But down the line, the preamp might be something that you’ll add to your home studio, especially if you decide to stream your audio online.
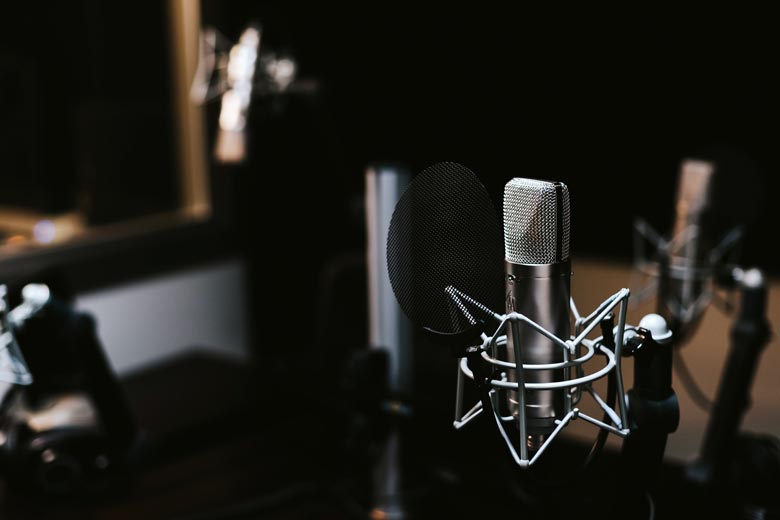
A Microphone, Pop Filter, and Mic Stand

Each instrument requires a different type of microphone. As you get started with your work, you’ll begin to assemble a collection of mics that will make studio-quality recording much easier at home.
If you’re recording vocals, you’ll do better with the large diaphragm condenser vocal microphone, such as the RODE NT1-A.
With high-frequency instruments like the piano, acoustic guitar, or cymbals, a small diaphragm condenser vocal microphone, like the AKG P170, would be a much better choice.
From the same company, the best option for low-frequency instruments is the AKG D112.
As for instruments like percussion, drums, and electric guitar amps, you can’t get any mic better than the Shure SM57.
As far as pop filters are concerned, you can’t have an excellent vocal session without one. Pop filters by Stedman, such as the Stedman Proscreen XL Pop Filter, are reasonably affordable and are of good quality. So, adding one to your mic won’t do you any harm.
Finally, with mic stands, the more solid ones come with an equally solid price tag. Starting with a cheaper one will be adequate. This adjustable microphone stand from Amazon Basics is very popular and has received a lot of great reviews.
High-Quality Headphones

If you require studio-quality sound at home, you need a high-quality pair of headphones.
There are two main types of headphones to choose from:
- Open-back headphones, which usually offer a better sound stage but less isolation.
- Closed-back headphones, which offer more isolation, but their sound quality isn’t always as good.
There are absolutely great headphones in both categories but the type of headphones you should choose depends on how you will use them.
When recording, use closed-back headphones as they won’t leak as much sound as open-back models.
A great option is the popular Beyerdynamic DT 770 Pro!
These headphones can of course also be used when mixing and mastering, but many professionals favor either studio monitors or open-back headphones for that. A great option for open-back headphones is the fantastic Beyerdynamic DT 990 Pro!
Studio Monitors

As we know, most home studios use open-back headphones for mixing and mastering. It is a more convenient and often cheaper alternative to studio monitors. But if you don’t want headphones, speakers can be excellent for monitoring.
In pro audio, speakers are also called studio monitors, which come free from any tonal enhancements you may find in the average pair of consumer speakers.
These monitors provide neutral sound and have a flat frequency response, which will give you the chance to judge and edit your mix objectively.
Generally speaking, studio monitors can be a bit pricey, but they offer an excellent mixing experience than a pair of headphones, which might be worth it to you.
Our recommendation for a great studio monitor that won’t cost you too much would be the KRK Classic 5 Professional Monitor.
Read more: Can You Use Hi-Fi Speakers As Monitors?
How To Create Studio Quality Sound at Home
With all the equipment mentioned above, you’re just about ready to take your audio to a whole other level. But are you sure you’ve troubleshot all the issues?
If you want to produce beautiful audio at home, you’ll need to get rid of everything that makes a sound from the premises, which involves creating clean, neutral surroundings and improving your techniques.
Treat Your Room
You can’t have pure, clean recordings if you can still hear the hum of the mini-fridge from the corner.
Room treatment requires creating a segment in your room that’s specifically for recordings.
You can add a cage and wrap it around the spot of your mic stand, or convert a small section or closet into an iso-booth.
But if you want a good recording experience, it’s better to use a larger space as your iso-booth instead of a small closet.
You will need to invest in sound-proofing the room as much as possible, so no sound comes in from the outside. You’ll also need to check the acoustics of the place before you settle, as your mic is sensitive enough to catch every grainy, muffled sound.
Put in your roots after you’ve checked each room in the house for the best acoustics.
Factor in Noise and Remove It
You’ll want to banish all noise to a galaxy far, far away. For external noise, while you can’t control the noise outside, investing in shock absorbers and windshields for the mics will cut down on the noise transfer.
If you’ve prepared a room in the house as your studio, it’ll help if you remove any reverberations, echoes, and background noises from your surroundings.
You can do this by adding foam to the walls or rearranging any corners and nooks so there’s no noise coming from there. Adding blankets or bookshelves is also a good idea.
But with internal noise, remember that it’s just not these things you’ll need to take care of.
UPS, hard drives, refrigerators, and additional gear create sound and interrupt your recording sessions if you don’t take preemptive action.
Start by turning off everything that is under your control during all recording sessions. Cover any electronic device that you can’t turn off with a cardboard box, and remove all equipment at least five feet away from your microphone’s location.
If you still hear something whirring too loudly, you will need to get rid of it. The last thing you want is the sound of your squeaky chair in the background of your audio.
Learn the Basics of Vocal Mic Technique
During the recording session, you’ll want to be at your best to get the best audio in the initial takes. However, if you don’t know how to vocalize, you will get in trouble.
Basic vocal mic techniques don’t involve a lot of complex movements, but they do require you to be at your best.
For example, when creating audio, it helps more if you belt it out loud and proud. If you decrease your performing volume during the recording session and save your vocals for the right time, you only end up sounding distorted, which will overload the preamp.
Instead, bring out your best sound during the recording session so that you can recognize yourself at your highest level.
When performing during the recording, keep your mic away from your mouth by four inches.
Adding a proximity effect is good if the situation calls for it. But essentially, “choking” on your mic will muffle your sound, and your audience won’t be able to understand a word you say.
Keep the mic in front of your mouth, not too close, and not in front of your chest, because your voice should transfer to the mic.
If you like to hold the mic while recording, do not cup the mic, as it will negatively affect your performance, which will create mud and squealing feedback.
Know Your Limitations
While all the details mentioned above are enough to give you a result akin to studio-quality sound, understand that there will still be something amiss because of the few limitations you can’t change.
For example, if you have a rectangle or square room, recording in such a space will create certain standing waves, affecting specific frequencies. As a result, the overall sound that’s recorded will be affected.
Nevertheless, your job at the moment is to minimize that effect as much as possible.
Use heavy curtains, bookshelves, and additional material for sound-proofing the room.
Invest in the right equipment, so you get your money’s worth, and try your best to add to that collection of equipment as time goes.
One of the most significant limitations with at-home studios is the lack of additional pieces like horns or live drums. You want to have a large ensemble, one that does not limit your creativity.
You’ll need to find a way to create backups for your work so you have everything within reach.
While you may have good electronics, the best computer there is, and an unlimited supply of power from your UPS, you cannot predict when a glitch may end up creating trouble.
Have backup drives for your recordings, which will assure you that your content is safe.
If possible, buy a laptop primarily for your recordings, and back up your recordings to your laptop computer. While you may not need to take your sounds wherever you go, it helps to have them handy if you ever need to show them to someone.
Finally, do your best to increase your knowledge. The industry is evolving day by day, and if you want to improve your work, you’ll need to be on top of your game.
Learn every day, find mentors, and take classes on improving your craft. Even if it is a hobby, strive to be great at it.
Have Backups for Your Equipment
You’ll need to have backups for all of your equipment, such as your keyboard, mouse, mic, and headphones. Especially with headphones, it helps to have two pairs of closed-back headphones.
You could choose to buy open-back headphones for any mixing, but you shouldn’t need them if you have your studio monitors.
While recording, you should have the closed-back headphones ready and raring. Headphones are essential, and unfortunately, easy to break if you’re not careful. Having a second pair of headphones will at least help you stay consistent while recording.
With other things like a mouse or keyboard, these things rarely break, but it still helps to have an additional piece if you have someone else coming over with equipment. Having two mics makes it easy to hold recording sessions for two people.
Closing Thoughts
Creating studio-quality sound at home is possible, but only if you follow all the directions mentioned above.
Find a solid mic stand, get a pop filter, invest in additional hard drives, and don’t worry about getting the hi-fi equipment because someone else has it.
Even with only the essentials, you will have everything you need to create auditory magic.