We live in the digital music era, a phase in music history where we can play any song by any artist on our phones at the tap of a finger. While digital music has made music consumption simpler than ever before, formats such as vinyl albums have not gone out of fashion, not by a mile. However, If you don’t know how to play a vinyl record, you may get it wrong and harm your albums.
Here’s how to play vinyl records:
- Set up your gear.
- Place the record on the turntable.
- Set the record player’s speed.
- Turn on the turntable and then clean the record.
- Get the tonearm to work.
- Flip the vinyl record.
- Stop the record.
This article will help you understand the process of setting up and playing the vinyl record player, along with its essential components. We’ll also discuss multiple cautions you must take, specific guidelines that you should follow when you play your vinyl record player, and lastly, a list of some of the best vinyl record players available in the market.
1. Set Up Your Gear
The first step to playing a vinyl album is setting up your required gear, like the speakers. Some record players may already have built-in speakers. If that’s the case for you, you can skip this step.
However, you’ll require external speakers if you only have a turntable without speakers.
Even if your device contains speakers, you’ll probably want to invest in a great pair of external speakers. The built-in speakers can, of course, be enough for some but in most cases, you’d want external ones to really enjoy the music on a higher level.
But speakers aren’t the only gear you will need to be able to play vinyl records. Depending on your record player and speakers, you will also need a separate preamp and a regular amplifier.
Watch this very informative and helpful video to understand what gear you need to play vinyl records and which alternatives there are to choose between:
Setting Up Speakers for a Record Player With a Built-In Preamp
Setting up the speakers is a breeze if your record player has a built-in preamp and your speakers have a built-in amplifier. In that case, you will just have to use the red and white RCA cords to connect the record player to the speakers.

Some versions, like the Victrola Aviator Turntable (available on Amazon.com), have a 3.5-millimeter line out port that you can use to connect to other devices such as speakers and headphones.
It also has options for Bluetooth connectivity, making this a truly versatile and fantastic pick.
If you have an external preamp, double-check that you have correctly connected the speakers and record player to it.
If the speakers are not powered, you should have plugged the record player into the preamp input and connected the speakers (or the amplifier) into the output.
Setting Up Bluetooth Speakers
If you have a record player with a built-in Bluetooth transmitter, you can use wireless speakers. All you have to do is pair the two devices.
However, the instructions for pairing will vary depending on your record player, so be sure to check your user manual for a step-by-step guide.
Bluetooth communication almost removes this need for additional wires and cords, resulting in a tidy setup. Moreover, it has a greater range than standard cables.
If your record player doesn’t have a Bluetooth transmitter to send the audio wirelessly to a pair of wireless speakers, there is an option to connect a separate transmitter to it.
Setting Up USB Computer Speakers
Lastly, with some turntables, you can use a USB cable to attach the record player to a computer speaker.
Your turntable will only have a USB output if the device has a built-in preamplifier. If it doesn’t, you will need to buy a separate preamp to be able to connect it to your computer speakers.
2. Place the Record on the Turntable
Now, once the speakers are in place, remove the record from its jacket and inner sleeve with care and set it on the turntable’s platter.
It’s important to mention that how you store your records is a vital skill for maintaining the longevity of your albums. Unfortunately, it’s one of the most ignored aspects of record handling.
Let’s go through some basic techniques that you can master quickly and safely to protect your precious and expensive records:
- Remove the inner sleeve from the jacket.
- Insert your hand inside the inner lining or sleeve and position your index, middle, and ring fingers on the center sticker.
- Make sure that your thumb is on the outer border of the record.
- Pull the record out of the sleeve, being careful not to touch the record’s face or surface.
No matter what you do, avoid touching the rough, grooved surface of your vinyl record.
The oils and dirt from our fingers can clog up the grooves and contribute to deterioration. So, keep your fingers on the outer edge or the sticker in the center of the album.
Now, place the record on the platter gently. Because vinyl albums have an A and B side, be sure you put the album on the right side for the track you wish to play.
Watch this short video to understand how to properly handle vinyl records:
3. Set The Record Player’s Speed
It’s essential to understand many speed settings for your player and the various kinds of discs.
The speed of a turntable or record player determines how quickly the platter spins your album.
Faster speeds are for playing smaller records like EPs, while the slower speeds are for larger albums.
78, 45, and 33 1/3 RPM are the different speeds that records of various sizes play at. A standard, full-size LP requires a rate of 33 1/3 RPM, which is likely what you’ll want since single-sized records aren’t so common these days.
4. Turn On the Turntable and Then Clean the Record
Press the start button to start the platter and get the record rotating. This button or lever is usually different on every record player, and some may not even have start buttons. If that’s the case, your record player or turntable might start up the platter when you lift the arm.
The record should start spinning as soon as you trigger the start.
Before you place the stylus on the record, take an anti-static record-cleaning brush and carefully clean the album while it’s rotating to clear any dust or grime that could be on the record’s surface.
I also recommend cleaning a new album before placing it on the platter.

To do so, apply a specialized cleaning fluid like EVEO Vinyl Record Player Cleaner (available on Amazon.com) on the record and then wipe the record’s playing surface with a dry, clean, and lint-free soft velvet brush in a rotational movement.
I like this specific kit because it comes with all the cleaning tools you’ll need to get the job done without damaging the fragile record grooves.
Maintaining the cleanliness of your records has various advantages, the most important of which are preventing deterioration, scratching, and skips on your album.
The kit from EVEO is really simple to use and if you want to see it in action, watch this short video:
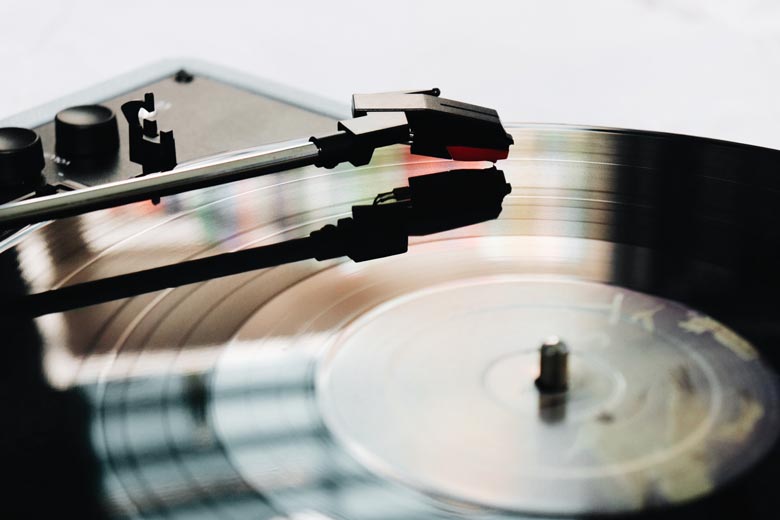
5. Get the Tonearm to Work
Now that the record is clean and spinning, it’s time to trigger the tonearm!
Elevate it from its cradle using the cueing lever to activate the tonearm. Once you have lifted the tonearm, slowly glide it across the turntable’s edge, hanging above the record’s outer edge.
To play a record from the starting point, align the stylus with the smooth-looking grooves on the outer side of the album. Then, using the cueing lever, which is usually near the back of your record player, slowly lower the tonearm until the stylus makes contact with the record’s surface.
You’ll have to elevate and release the tonearm manually over the vinyl if your record player doesn’t have a cueing lever.
However, you must do this with the utmost caution, as the stylus might cause harm to the record if it touches the record’s surface too forcefully.
You can gently move the tonearm up and down by placing your pinkie finger on anything stable adjacent to the turntable. And voila! Now you may relax and enjoy the music as the record is playing!
6. Flip The Vinyl Record
The way records are maintained, as mentioned earlier, is critical to their durability, and how you flip your vinyl or change songs will play a significant role in the longevity of your album.
To switch the songs on your record player:
- Use the cueing lever to elevate the tonearm as the record is still rotating.
- Count the well-defined delineated rings that match the track numbers on the record’s surface.
- Bring the tonearm down gently to the point where the track you want to listen to begins on the record surface.
However, there are certain things that you need to keep in mind while changing the tracks:
- Heat build-up in the stylus. Record players use friction to create audio, but that friction will also produce heat. This heat needs to discharge before you move the tonearm, so you will either need to lift the tonearm before flipping the record or allow the album to play to a complete stop before moving it.
- Practice makes perfect. I know that aligning the stylus precisely with the record groove is a challenging thing to do initially, and you might catch the last part of the previous song or be a few minutes into your preferred track as the stylus touches the groove. However, with time, it will get easier.
7. Stop the Record
While the record is still spinning, lift the tonearm properly to stop it. Never stop the platter from rotating until you have raised the tonearm.
Transfer the tonearm to its cradle, then cleanse the record with the same anti-static brush when it’s still rotating on the turntable, following the same procedure as before.
When you’ve finished cleaning the record, press the start/stop button to put a stop to the platter or the turntable, then instantly transfer it to its cover or sleeve or flip it over to play the other side of the record.
Essential Components of a Vinyl Record Player
If you’re considering purchasing a turntable or own one already, you must understand how to use it properly.
But first, let us talk about the critical parts and how they function to transfer music from a vinyl record to us via speakers.
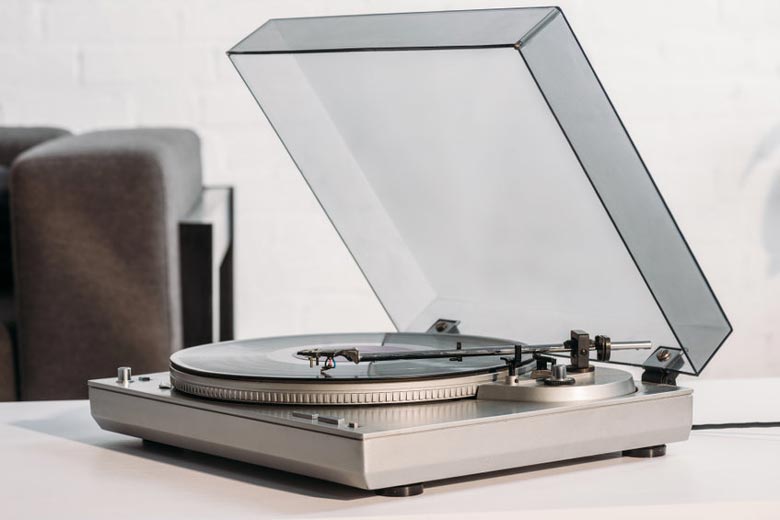
Now before you learn to set up a record player, you must first comprehend the basic features of your vinyl record player.
See an in-depth video about the essential components further down this post.
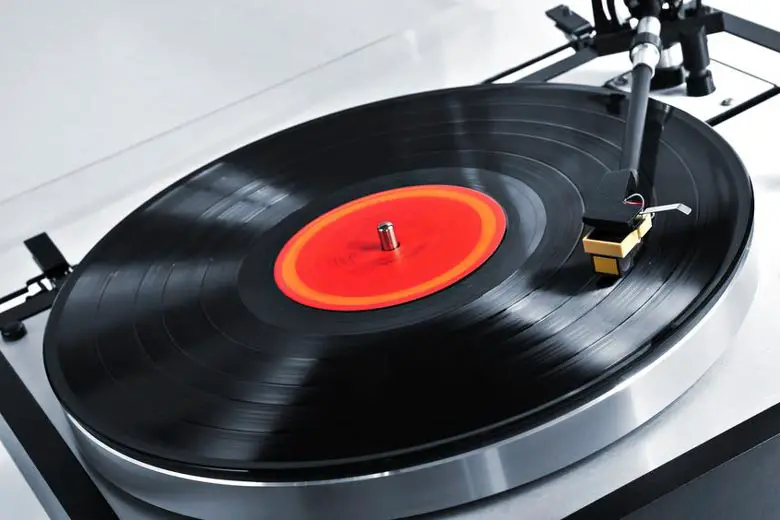
The Platter
Most versions of vinyl record players have a component called a platter.
Whether you have a modern record player or a classic device from the early twentieth century, also irrespective of the brand or the make, you’ll have the platter. The platter rotates the vinyl records steadily and keeps them in place.
The platter is usually covered with a felt or rubber mat to eliminate static and scratches that might harm the disc. There are also platter mats made of cork or leather.
The Tonearm
The tonearm is one of the most critical components of a vinyl record player. The arm has two parts– the needle and the cartridge.
The tonearm holds the stylus, or needle, which, as we said earlier, along with the cartridge, is responsible for creating the sounds.
When you play an album, the diamond-tipped needle moves through the record’s grooves, causing vibrations that wriggle their way up to the cartridge.
Read more: This is How Vinyl Records Work
Straight or curved tonearms are available in the market. The choice can be entirely personal. Although some argue that curved tone arms provide superior sound, some hip hop musicians and DJs favor straight arms since they may be simpler to move.
The Stylus
The needle that lies on the record is known as the stylus.
A stylus is typically a cone-shaped part made of diamond, the most durable, resilient natural substance on the planet. Sapphires, in addition to diamonds, are widely used for record needles.
A flexible metal strip connects the stylus to the tonearm. The stylus moves up and down between the record grooves because of the suppleness of that metal strip.
The stylus might be straight and pointy or spherical. Elliptical (straight) styli improve sound quality by permitting more engagement with the groove on the vinyl record. On the other hand, spherical styli are lower-quality, although they are more responsive.
However, even a diamond-tipped needle will wear down after a while. The experts say you should change the stylus once you’ve listened to the music for 1000 to 2500 hours.
Record Sleeve
The outer wrapping of a vinyl record is known as a record sleeve. It’s also called a dust sleeve or album liner.
These sleeves are usually made of paper, cardboard, rice paper, polypropylene, or other materials that might be acid-free or anti-static, with a poly-lined inner shield.
Amplifiers and Preamplifiers
Nowadays, most audio receivers can pick up signals from CD players, DVD players, MP3 players, and other streaming services. That means they aren’t always well-equipped to handle the audio output from a standard record player.
A phono preamplifier, also called a preamp or phono stage, used to be the most common (and for a while, the only) preamp available for record players. However, phono preamplifiers are not as standard as they used to be.
Yet, if you ask a genuine audiophile, they’ll tell you that the finest sound quality comes from a specialist phono preamplifier. So, if you want to harness all that your record player has to offer, you may want to give one of these preamps a try.
Watch this in-depth video of how everything works and what you as a beginner need to know when starting out with playing vinyl records:
Setup for Playing a Vinyl Record
As you plan to start spinning records, there are several steps and processes that you’ll have to keep in mind.
Verify That Your Turntable Is Level
Before playing records, ensure your turntable or record player is level. Occasionally, they could get a bit out of whack, but a minor adjustment of the player’s feet will keep it stable and balanced.
Records can be damaged over time by a turntable that’s not level since the imbalance will make the stylus slide a bit and speed up at the wrong time.
So, be sure to use a level and keep that record player as straight as possible.
Clean the Dust From the Record Player
It may seem self-evident, but you must remove the dust from your turntable or record player before placing a record on it.
Dust won’t only damage your album, but it might find its way into the record player, gunking up the oily cogs and belts inside.
So, if you want to prevent your record player from breaking, use a dust cloth or record-cleaning brush to clean off the interior of your record player every once in a while.
Check Your Records Over Before Playing Them
Be sure to check your records for dust and damage before settling them on the platter. Dust is easy to fix with a quick clean-up, but debris like sticky food or oil can damage your stylus and make your record sound terrible.
Likewise, chips, cracks, and significant scratches may damage your stylus.
Before playing them, a visual check of records is sufficient to avoid unwanted harm to your stylus, which is extremely sensitive to anything on the record’s surface.
Also, make sure your album is clean before playing it since it may require a thorough cleaning before spinning.
Ensure the Your Tonearm Is in Good Condition
Suppose it’s been a while since you looked at your tonearm’s calibration or tuning. In that case, it’s always a good idea to double-check the anti-skate setting, tracking force, and other settings to ensure everything is functioning correctly.
Keeping up with your tonearm maintenance is critical for sound, stylus, and record protection.
Take a Closer Look at Your Stylus
The stylus is extremely sensitive and will draw any filth or particles present in the air.
The stylus rakes up any material accumulated in the record’s grooves as well, so checking it regularly and cleaning it with a stylus brush once every four to five plays will prevent most problems.
Placement of Your Separate or Standalone Speakers
If you use external speakers, placing them in the correct positions will significantly impact the quality of music and your audio experience.
You shouldn’t keep them too near to a wall, and you don’t want them too close to each other — the optimal speaker placement provides an ideal triangle for both you and the external speaker.
These tips should steer you in the right direction, whether you’re planning to buy your first turntable after discovering the delights of vinyl, replacing an outdated turntable, or hoping to optimize your present record player.
Quick Fixes for a Record Players That Won’t Play
Sometimes, even if you take precautions to ensure that you have set up the record and your instruments correctly, things might go amiss once you play your records.
These are a few guidelines to fix the problems at your end before you reach out to the experts:
- Consult your user manual. When attempting to mend any tonearm difficulties, the first rule is always to verify and follow the manufacturer’s instructions. Be sure to set up the tonearm according to the manufacturer’s instructions since failing to do so usually causes some of the most common record-player issues.
- Level the record player or turntable. If the platter of the turntable or record player isn’t level, the tonearm may shake when it shouldn’t. Because many tonearms are pretty sensitive, it’s critical to be as accurate as possible while leveling the platter.
- Check the tonearm’s level. It’s possible that the tonearm is not descending far enough to allow the stylus to make an adequate connection with the platter’s record. You might not have lowered the tonearm bridge sufficiently if this happens. In most situations, there’s a screw that you can tighten to modify the bridge’s height and, as a result, fix this problem.
- Check the cueing lever. If this is still not fixing the problem, the cueing lever’s damping capabilities are likely the culprit. Investigate the lever and check it for blockages, and wiggle it a bit to help it release.
- The cartridge may also be linked back to hum or other noise interference, so make sure it’s correctly mounted and attached to the tonearm first. Before messing with such a fragile component, it’s usually a good idea to search up particular cartridge recommendations.
- For poor or no sound while playing your recordings, the faulty tonearm balancing adjustment might be the reason. The required weight won’t be delivered to the stylus when adequate Vertical Tracking Force (VTF) isn’t applied, and it won’t trace the record grooves accurately. If the VTF is too low, the tonal quality will be faint, and you won’t hear any bass notes.
Best Record Players
Whether you’re just entering the vinyl record scene or have decades of experience, using a high-quality record player will always make your music sound better and protect your vinyl albums from stress-related damage.
I’ve picked up the top record players in the market (all available on Amazon.com) to help you find something worth playing your favorite albums on.
These record players make the process of cueing up a record simple, and they will protect your albums from stylus scratches, dust, audio interference, and other common troublesome issues.
If you want to stream your vinyl records, you may acquire a wireless Bluetooth platter or a USB turntable if you wish to make your record collection digital.

Fluance RT81 Elite
The RT81 Elite High Fidelity Turntable from Fluance reproduces vintage LP and EP vinyl records with fantastic fidelity and the most precise sound possible.
Take out your favorite 33 1/3 or 45 RPM records, connect your audio system, lower the needle, and submerge your musical side in the Fluance RT81 Record Player, which has the most nuanced music performance. The sharp, distinct music features you enjoy will grab your spirit.
Superior components enable this belt-driven turntable to deliver a clean, unadulterated listening experience that faithfully replicates the artist’s original performance.

Marantz TT-15S1
Marantz had long recognized the rebirth of vinyl and what it meant to musicians, audiophiles, and critical music lovers who have always favored the warmth, richness, and acoustic authenticity of analog sound.
They’ve been in this niche for the last 50 years since they released the first audiophile turntable.
The TT-15S1 from the Reference Series continues the heritage with a unique blend of pure audiophile design and cutting-edge materials that work in tandem to give the most pleasing listening experience.

Retrolife Vinyl Record Player
The Retrolife Vinyl record player is a good option if you have a tight budget or have just started exploring the vinyl music scene and want a reliable, good-quality music experience.
This incredible machine has built-in speakers and Bluetooth connectivity, as well as a 3-speed turntable (33, 45, 78 RPM), a 3.5mm aux-in connector for playing songs via non-Bluetooth devices, and an earphone jack.

DIGITNOW Record Player
Another cost-effective option available, this leather Suitcase with Multi-Functions Turntable is an all-in-one record player with FM radio, built-in Bluetooth receiver, LP to MP3 conversion, and much more.
It’s a fantastic entry-level record player if you’re just getting into vinyl, and it makes a lovely focal point for any room.
Conclusion
Playing a vinyl album takes a bit of practice if you’ve never done it before, but once you get the hang of it, it’ll become second nature.
Still, it’s essential to pay attention to the details and note the condition of your LPs, record player, and all of the tiny components that bring your favorite albums to life when you cue up your record.
If you take good care and follow these steps, you’ll be enjoying your music for years to come.